
Utilize the Gazoom CSGO strategy tool to immediately obtain your CSGO lineups within the game. We have all the dust 2 smokes you’ll ever need, ready to go, so you can stop winging it with your cigarettes. Simply view them while playing on your second screen! Enjoy the tutorial below if you’d like to read them as articles.
1. T’s A-Long smoke (no bind required)
This smoke is aimed at the mosaic’s center. To correctly throw the smoke, direct your crosshair at the end of a palm tree leaf. Although lower tiers may encounter some variance, the smoke will still have its intended effect. This simplistic smoke trick is easy for anyone to remember because it doesn’t call for any extra help or binds.
2. Easy X-Box Smoke (no bind required)
It’s never been simpler to master the Xbox smoke. Aim towards the antenna’s tip by lining up your crosshair with the reference image. The smoke grenade should properly hit X-Box when you let it go. There are no jump throw bounds necessary for this method, which is safe and simple. This technique can be used to cast smokescreens over X-Box even if you are slow. There is no need to go deeper for a tried-and-true approach to putting out this smoke.
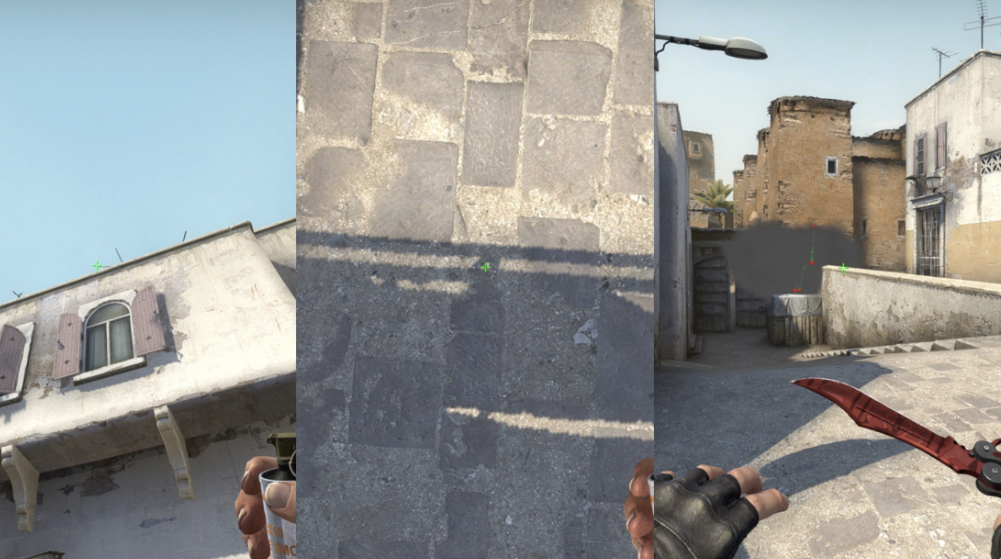
3. CT Smoke from X-Box
Positioning oneself strategically is crucial for executing a successful B-Split near X-Box. The player carefully adjusts their stance, ensuring that only the shadowy area above the middle doors is visible to them.
- With their focus sharpened, they take a small step forward, aligning themselves precisely with the intended trajectory. Their attention is drawn to a minute dark spot on the left wall, serving as a key reference point;
- The anticipation builds as they prepare to release their smoke, a critical component of the B-Split strategy. With a deft motion, the smoke is unleashed, billowing forth and obscuring the intended area. This method serves as a reliable guide, providing the player with the necessary direction to execute the B-Split effectively;
- By following these meticulous steps, the player gains an advantage in navigating the complex dynamics of the gameplay. The smoke serves as a strategic tool, hindering the vision and movements of their opponents, while allowing their team to maneuver and execute their planned strategies with precision;
- The player’s mastery of this technique becomes evident as they seamlessly integrate it into their gameplay, creating opportunities for seamless teamwork and coordinated attacks;
- The B-Split near X-Box becomes a well-executed maneuver, one that showcases the player’s strategic prowess and ability to adapt to the ever-evolving dynamics of the game.
4. Crossover smoke from long
With the recent update, the once-familiar crossover smoke at de_dust2 has undergone a transformation, becoming more intricate and demanding. To execute this maneuver, the player positions themselves in close proximity to the barrel at long, preparing for a precise throw.
- Their crosshair is carefully aligned, aiming slightly above the lamp, a critical point of reference. With the preparations complete, they swiftly begin their run, launching the smoke with expert timing;
- The trajectory is calculated to perfection, ensuring that the smoke lands flawlessly as the antenna on the left grazes the ceiling. Notably, this technique does not require any binds or external assistance, relying solely on the player’s skill and execution;
- However, it is essential to acknowledge an important change that comes with the update. The once-effective single smoke to completely block off crossover is no longer sufficient. Adaptation is necessary, and the player must be prepared to employ alternative strategies;
- This may involve utilizing two separate smokes or taking calculated risks to secure the desired outcome. The complexity of the situation challenges the player’s ingenuity and flexibility, requiring them to devise innovative approaches to maintain control over the crossover area.
While the updated crossover smoke presents a greater challenge, practice serves as the key to mastery. Through dedicated repetition and refinement of their technique, the player can gradually hone their skills and navigate the intricacies of the maneuver. With perseverance and commitment, the once-daunting task of executing the crossover smoke will become second nature, allowing the player to maintain a strategic advantage in their gameplay.
5. CT Smoke from Short
Strategically position yourself in the corner of short and aim for the top center of the small mosaic wall. Execute a left-click throw, and your smoke will bounce off perfectly, blocking any vision from CT Spawn.
6. B-Tunnels smoke from outside B
Hey there, if you wanna nail that smoke grenade right at the entrance of B-Tunnels, all you gotta do is get close to the wall in front of BombSite B and blast it towards the crane above. Just give it a good ol’ left-click throw, and boom, your smoke will land spot on! This trick works like a charm when you whip it out early in each round, ya know?
7. Mid crossover smoke
This smoke is like the one in the older version of de_dust2, but hey, we’ve got it in this guide for all you new players out there. So, to make this work, just plant your crosshair where I’m showing you and chuck that nade. Voila! You’ll be able to saunter through those doors with minimal risk of getting sniped by some enemy AWPer. And if you ain’t keen on using a smoke too early in the round, no worries! Swap it out for a good ol’ High Explosive Grenade, and you’re still golden.
8. Mid to B B-plat smoke
Playing against opponents on the B-Plat can present a challenge, however, this smoke can make it more manageable. It is important to remember that this smoke will not provide adequate cover from players who are pushing tunnels. To effectively execute a smokescreen when exiting B site at Plat, position yourself at the far edge of the building’s shadow. Align your crosshair accordingly and click the left mouse button for a secure entry through doors or Widowmaker spots.
9. Scaffold smoke
In case you have observed your adversary utilizing the Scaffold position in previous rounds. There is a likelihood they might revert back to it once more. To gain an advantage and compel them to retreat. Try using a smoke grenade to block off their area from your own location.
1. Pop-Flash A Site
Standing tall on the small ledge of short A, the player assumes a 180-degree angle stance and directs their aim towards the center. The flash is executed swiftly, catching anyone monitoring that area off guard and leaving them with minimal time to react. This straightforward strategy proves highly effective.
2. Short Pop-Flash (CT perspective)
Taking position at the corner of short A, the player strategically prepares to unleash a well-placed flash grenade. Their crosshair aligns precisely with the 3 bar positioned atop the minuscule green roof. With a deliberate left-click throw, the flash is deployed, emitting a luminous burst that catches opponents on Short off guard.
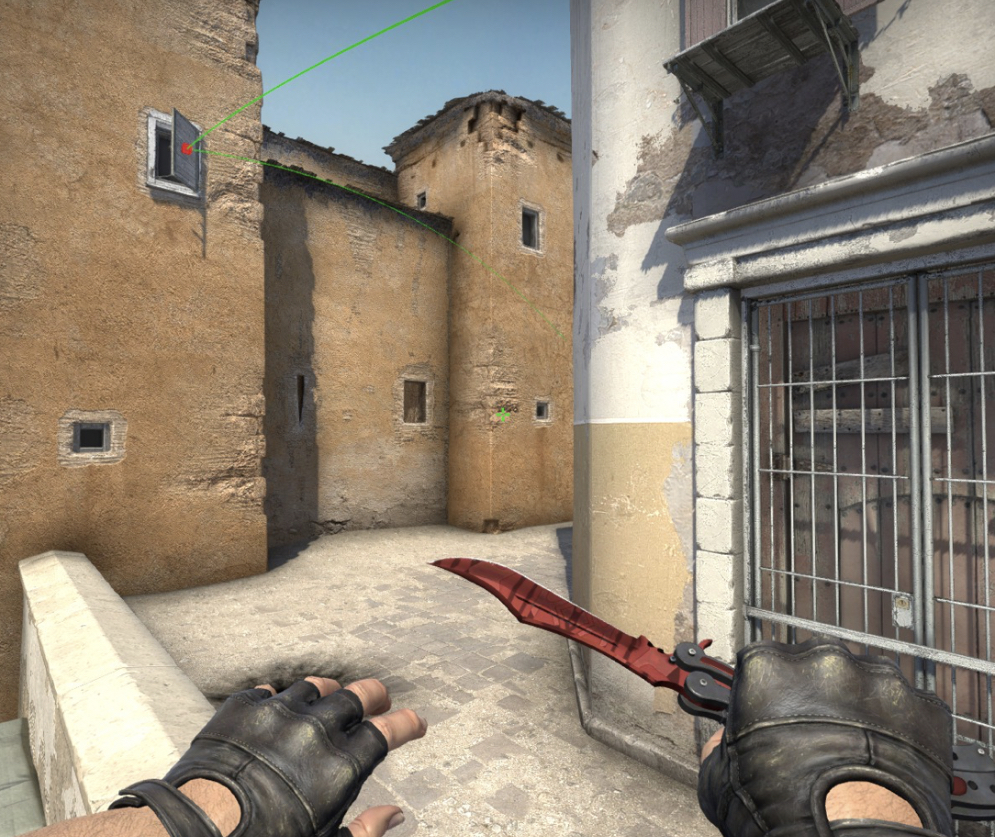
3. Short Pop-Flash (T perspective)
Considering the Terrorist perspective, this Short pop-flash is specific to recent versions of the map. It’s important to note this when playing in offline lobbies or community servers using workshop version maps. By throwing the flash at the small window, it bounces off and blinds any CTs holding short.
4. A-Long Pop-Flash for CTs
Recognized as one of the most legendary Pop-Flashes on de_dust2, the player swiftly hurls their flash against the wall, strategically positioning it to their advantage. As the flash detonates, its blinding radiance engulfs the area, leaving opponents in Long temporarily disoriented or even forcing them to divert their attention. This tried-and-true technique, when executed flawlessly, not only neutralizes the threat in Long but also opens up the possibility for rapid and secure eliminations, cementing its reputation as a formidable Pop-Flash strategy on de_dust2.
5. Old Pop-Flash into B-Site
In the quest to retake bombsite B, the tried-and-true “Pop-Flash” emerges as a formidable option. Executing this maneuver entails throwing the flashbang in front of the doors at B Site, allowing it to pass through and blind any adversaries poised to strike. While not as blinding as certain other flashes, this classic trick possesses the power to tip the scales in your favor during the intense moments of a B Site retake. Its reliability and simplicity make it a go-to choice for those seeking an edge in high-pressure situations. This technique has stood the test of time, proving its effectiveness in countless rounds. Its ability to catch opponents off-guard and disrupt their aim makes it an essential tool for retaking bombsite B and securing critical victories.
6. Cheeky and unavoidable B-Site Pop-Flash (for CTs)
In their quest for dominance, the player strategically situates themselves in the cunning corner of Bombsite B, adopting a position that grants them a tactical advantage. With precision and focus, they align their aim as depicted in the accompanying image, preparing for the crucial moment. As the flash reaches its readiness, they execute a swift spin, catching unsuspecting opponents in B Tunnel completely off guard. Yet, caution must be exercised, as excessive reliance on this maneuver may lead to opponents adapting and devising countermeasures to counteract the element of surprise. It is vital to strike a balance between exploiting the tactic’s effectiveness and ensuring its longevity as a powerful strategic tool.
7. A-Long Pop-Flash for Ts
Strategically throwing a flash-bang at A-long on Dust 2 has become more challenging with the new version. To execute an effective pop, the player left-click throws the flash over the highlighted building in the picture and quickly peeks long for a guaranteed kill. Caution must be exercised not to hit any walls and risk blinding oneself and teammates.
8. Pop-Flash from car
Playing from a car often means a life-or-death situation, with the latter being more common due to peeling advantages. However, by pressing RIGHT and LEFT click simultaneously while pointing the crosshair as shown in the image, the player can surprise opponents and easily eliminate them. This great pop flash tactic can significantly increase their success rate.
9. Pop-Flash for CTs holding B
Taking a proactive approach, the player rushes into B with 1 or 2 flashes, catching opponents off guard and preventing them from preparing in time. Positioning and crosshair placement must be precise before throwing the flashbang. When executed flawlessly, this simultaneous action leaves enemies with little chance of survival or counterattack.
10. A-Doors Pop-Flash for Ts
In the ongoing battle for control over Long, the player demonstrates their finesse by employing a well-practiced flash technique. Taking up position in the Door area, they align their crosshair precisely at the edge of the column. With a deft throw, a blinding flash cascades across the enemy CT holding the position, leaving them vulnerable and disoriented. This tactical brilliance not only grants the player a clear advantage but also paves the way for an effortless elimination, enabling the team to advance towards their objective with increased confidence. This calculated approach epitomizes the strategic prowess required in high-stakes engagements.
11. A-Doors Pop-Flash for CTs
The introduction of a prominent lantern near pit in de_dust2 brings a dynamic shift to the map’s dynamics. This alteration opens up new avenues for tactical maneuvers, including the skillful reflection of flashes, grenades, and molotovs towards A-Doors. Although not always hitting the mark precisely, the resulting chaos inflicts significant damage on adversaries and obfuscates their line of sight. Skillfully leveraging this environmental element grants players a distinct advantage, empowering them to outmaneuver and overpower their opponents in the relentless pursuit of victory. The strategic utilization of this newfound resource adds depth and excitement to the gameplay experience.
12. Catacombs Pop-Flash
In the face of CTs lurking in Catacombs, the player exhibits their expertise by executing a masterful flash strategy. By expertly lobbing a flashbang down the staircase, an explosive burst of light disrupts the enemy’s vision, leaving them disoriented and unable to react in time. This tactical brilliance not only neutralizes potential threats but also provides a golden opportunity for a calculated push, empowering the team with a decisive advantage.
13. Mid Pop-Flash from X-Box
The X-Box corner flash is a meticulously crafted maneuver in the realm of competitive gaming. As the player deftly deploys the flashbang at the top-right edge, a mesmerizing cascade of light engulfs the area, disorienting enemy AWPs and exposing their vulnerable positions. This calculated tactic not only disrupts the opponent’s vision but also instills a sense of fear and uncertainty, tilting the scales in favor of the attacking team during mid to B pushes. The strategic brilliance behind this combination showcases the depth and intricacy of high-level gameplay.
1. A-Site Molotov
Despite the recent update that made it slightly more challenging, the player is determined to master the art of launching a molotov at A-Site from Short. They understand the importance of effectively scorching their enemies in that position without exposing themselves to unnecessary risks. With a keen eye, they align their crosshair with the leaf of the palm tree, ensuring a precise aim. The tension builds as they prepare to throw the firebomb, knowing that success lies in their quick and accurate execution. As the molotov leaves their hand, it sails through the air, tracing a fiery path towards its target. Flames erupt, engulfing the designated area and forcing any opponents to either retreat or face the wrath of the inferno. The player’s strategic prowess shines as they eliminate potential threats and establish control over the A-Site.
2. B Car Molotov
With the stakes high and the pressure mounting, the player positions themselves strategically, adopting the recommended stance for maximum effectiveness. Their eyes lock onto the target – the B car, a potential hiding spot for lurking enemies.
- The player’s crosshair hovers above the imposing B doors, ready to unleash a molotov that will engulf the car in a raging blaze;
- They feel the anticipation coursing through their veins as they press the left click, propelling the molotov with precision and force. The fiery projectile soars through the air, leaving a trail of devastation in its wake. Upon impact, the car becomes a flaming inferno, leaving no refuge for any adversaries seeking cover;
- The intense heat and billowing smoke force the enemies out of their hiding places, exposing them to the player’s tactical advantage. As the molotov continues to burn, the player seizes the opportunity to secure advantageous positioning, carefully planning their next move.
The post-plant molotov becomes a crucial tool in their arsenal, providing them with a significant edge in retaking the site and dictating the outcome of each match. With each successful deployment of this strategic incendiary device, the player’s confidence grows, earning them a reputation as a formidable force to be reckoned with.